

How To Lay Artificial Grass: The Ultimate DIY Tutorial
Artificial grass is growing in popularity across the UK – fast. According to Aviva, 1 in 9 households have already made the switch from a natural lawn to artificial grass, and another 10% are planning to follow suit. It’s not hard to see why: no mowing, no mud, no patchy dead spots – sounds like a dream, right? If you’re thinking about making the switch, this DIY guide has all you need to know about how to lay artificial grass on soil, decking, or concrete. It’s a relatively straightforward job if you prep it right, and we’ll cover everything, from removing the old turf to choosing the best edging to finish the look.
Tools at the ready? Let’s get cracking.
- Why Choose Artificial Grass?
- The Artificial Grass Installation Toolkit
- How to Lay Artificial Grass On Soil: Step-By-Step Guide
- Laying Artificial Grass On Concrete Or Pavers
- Laying Artificial Grass On Decking
- Aftercare & Maintenance
- The Lowdown
Why Choose Artificial Grass?
Cutting down on lawn care is definitely one of the biggest wins, but there’s a lot more benefit to swapping real turf for artificial grass than that. If you still needed a bit of convincing before taking the plunge, here’s why homeowners and landscapers alike are making the switch:
· It’s A Long-Term Cost Saver: The initial cost of artificial grass is often higher than turf or timber decking, but you ultimately end up saving big on upkeep. Over 10-15 years, it’s likely to pay for itself, and then some.
· It’s Built To Last: Good-quality artificial grass can last up to 15 years with minimal wear and tear, even in high-traffic areas, making it a great investment for families, pets, or rented properties where durability counts.
· It’s Cleaner & Safer: Imagine a world where there’s no muddy footprints running through the house and no weeds cluttering the garden. Well, artificial grass is the best way to get there. Plus, it’s usually pet-friendly and kid-safe.
· It’s Got Year-Round Kerb Appeal: Simply put, it looks good 365 days a year, in all seasons: perfect for easily boosting kerb appeal or creating a usable outdoor space without the upkeep.
· It’s A Smart Investment For Small Or Shaded Spaces: Real grass struggles in shaded spots or gardens without enough space to grow. Artificial grass, on the other hand, is much less picky, looking good pretty much anywhere.
The Artificial Grass Toolkit
Getting a clean, professional-looking finish starts with having the right gear at hand. Luckily, we’ve created this artificial grass installation toolkit to cover most DIY lawn projects – wherever it’s being laid.
Tools
• Shovel or spade
• Rake
• Stanley knife
• Measuring tape
• Marker spray
• Joining tape and/or adhesive
• Wheelbarrow
• Hammer
• Pins, staples, stakes, and/or screws
• Plate compacter or tamper (usually hireable)
Materials
• An appropriate sub-base, like MOT Type 1
• Granite dust or sharp sand
• Edging materials (more on that later!)
Once you’ve got everything ready, it’s time to prep the ground and get stuck in…
How to Lay Artificial Grass: Step-By-Step Guide
Step 1: Prepare The Area
Good prep is half the job. Start by marking out your area using the marker spray, then remove any existing turf, plants, or loose topsoil. Once clear, dig down to around 70-100mm, giving yourself enough depth to add the sub-base and artificial grass so that they sit flush with paths, patios, or other garden features.
Once cleared, be sure to rake the area so that it is roughly level, and remove any rocks, large remaining roots, or debris. If your soil is particularly soft or uneven, compact it down using a plate compacter or tamper to stop movement underneath the installation later on.
Step 2: Create An Edge
Garden edging is key to keeping everything locked firmly in place. Without it, the base materials can shift over time, and the edges of your grass can curl or simply come loose.
There’s no one-size-fits-all here, and you can get creative with your edging options. Here are just a few to get the ball rolling:
• Timber sleepers for a practical and affordable option.
• Composite edging for a more refined, low-maintenance finish.
• Steel or aluminium edging for sharp and modern lines.
• Brick or stone for a curated and traditional look.
Whichever you choose, make sure your edging is set just below the final grass level so that the turf sits neatly against it. Fix it securely into the ground using screws or stakes, depending on the chosen material.
Step 3: Lay The Weed Membrane
Once your edging is in and secure, it’s time to place down a weed-suppressing membrane. This is how you should prepare to lay artificial grass to ensure that it actually lasts, keeping weeds from creeping through later down the line.
Roll it out across the entire area, making sure to overlap the edges by around 100mm. Then, fit it in place using pins or staples to keep it from shifting. Be sure that your chosen membrane still allows water to drain through to avoid trapping moisture.
Step 4: Add The Sub-Base
The sub-base is what will give your artificial lawn its strength and structure. Start by adding a layer of MOT Type 1 or crushed stone – about 50-75mm deep – and spread it evenly across the entire area.
Use a rake to level it roughly and then run a plate compacter over the top if necessary to compress it into a firm, stable base. This stops the lawn from sinking over time, especially under foot traffic or heavy garden furniture.
Next, add a 10-15mm layer of granite dust or sharp sand on top, and compact everything again. This acts as a screed layer, giving you a smooth and level surface to play with. The aim here is for a flat, solid finish with good drainage and no uneven spots.
Step 5: Roll Out & Cut The Grass
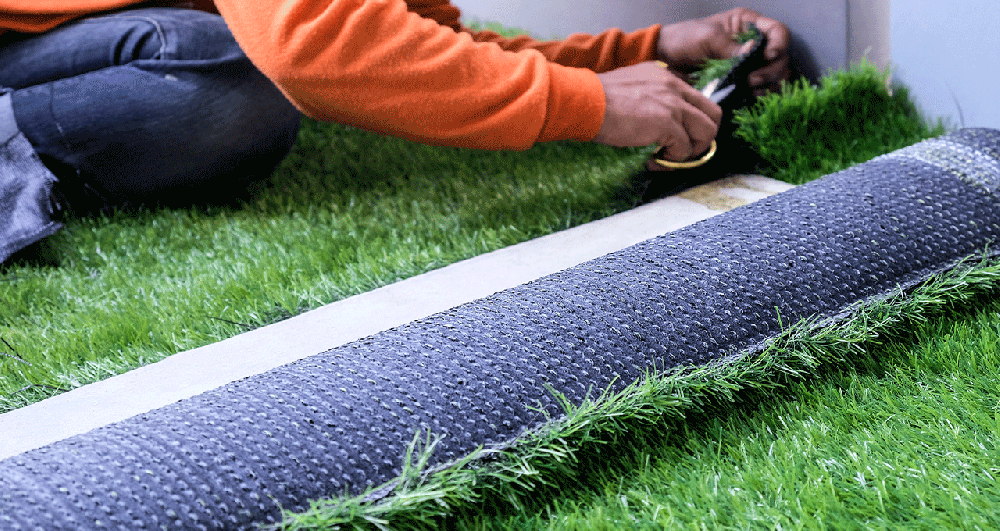
Now for the actual artificial grass laying! Roll your chosen turf out completely across the area and leave it to settle for a couple of hours so creases are removed and the fibres are able to relax naturally.
Make sure all the rolls are facing the same direction. Most artificial grasses will have a distinctive pattern, and mismatched sections will stand out quite clearly once the job’s done, so be sure to double check that everything looks consistent before you start the cutting process.
When you’re happy, and after measuring your selected area a couple of times, use a sharp Stanley knife to trim the turf to fit, leaving a little overhang where possible. Work from the backing side, aiming to cut along the stitch lines rather than slicing through the fibres, and take particular care around corners and edges.
Once everything is in position, trim back the overhang to ensure a snug fit.
Step 6: Join The Grass If Needed
If your lawn requires more than one piece of turf to fill the area, you’ll need to join them. To do so, line up both sections with a small 2-3mm gap, making sure that the blades of the grass point in the same direction.
Then, carefully fold back the edges and use joining tape or artificial grass adhesive evenly along the length. Carefully press the edges into place and smooth them down without stretching the turf.
Let the adhesive set for a while before walking or brushing over it – typically a couple of hours max, depending on the product used and the weather.
Step 7: Pin & Brush The Grass
With the turf nicely in place, it’s time to secure it. Use pins or landscaping nails around the perimeter, and anywhere that feels on the loose side, being sure to space them roughly every 20-30cm. To avoid flattening the pile, insert the fixings between the stitch rows.
Once secured, brush the turf thoroughly with a stiff broom, working against the pile to lift and settle the fibres, and create a full finishing look.
Step 8: The Finishing Touches
To round up the steps on how to lay artificial grass, it’s time to polish things up. Inspect the edges to ensure all the joins are set and secure, and trim any excess turf for a clean, flush finish.
If you’ve chosen to use infill (such as kiln-dried sand), now’s the time to apply it by using your stiff brush to work it into the base evenly. Infill helps to add weight, keep the fires upright, and improves drainage.
Then, there’s only one thing left to do: grab a brew, put your feet up, and admire your work.
Laying Artificial Grass On Decking
Artificial grass can absolutely be laid on decking, with a few key differences from the core process.
First, inspect your decking to ensure all boards are sound and securely fixed. Since the surface is uneven with gaps, you’ll need to create a smooth base by laying a foam underlay or exterior-grade plywood sheets, fixing them firmly over the decking. Drainage and weeds are less of a concern here since decking is typically raised and already has its own sub-base, but do ensure that there’s no trapped moisture underneath to prevent mildew growth.
Once the base is ready and you’ve created any edging, roll out your artificial grass and cut it to size, as described in Step 5 above. Then, follow Steps 6-8 to secure, pin and brush the grass, adding the finishing touches. Note that staples and nails are preferable to adhesive here, as the latter can damage the decking.
Laying Artificial Grass On Concrete Or Pavers
For pavers and concrete, the process also differs slightly…
Begin by thoroughly cleaning and checking over your concrete area, repairing any cracks or uneven surfaces as you go. Since concrete doesn’t drain water, it’s essential in the prep stage to either drill small drainage holes or install a permeable underlay designed for artificial grass. Adding a padded underlay will also help to improve comfort underfoot.
Once your base is prepped, roll out the artificial grass and cut it following Step 5. Secure the turf in place or join it using strong adhesive, since pins or nails won’t work on such hard surfaces. Finally, follow Steps 7-8 to complete the installation.

Aftercare & Maintenance
As we mentioned earlier, one of the biggest perks of artificial grass is how little upkeep it needs compared to a real lawn. However, that doesn’t mean there’s zero maintenance! If you want your project to look fresh, clean, and green for longer, a bit of regular TLC goes a long way.
Regular Brushing
Over time, foot traffic and general usage will flatten the pile, especially in high-traffic areas. To keep the blades standing tall, give the lawn a regular brush with a stiff broom to lift the fibres, just as you did as part of the installation. Once every couple of weeks should do it.
Keep It Clean
Leaves, twigs, and debris can build up fast, particularly in autumn. So, pull out that leaf blower or plastic rake from the depths of your garden shed storage to clear the surface without damaging the fibres. For spills or pet messes, a quick hose down with mild soapy water usually does the trick. For a deeper clean, especially if you’re noticing some funky smells, use a turf-safe artificial grass cleaner every now and then.
Weed Control
The weed membrane underneath will stop most growth, but occasionally weeds may sprout at the edges or in airborne dust that settles on the top (persistent, aren’t they?). Preferably, pull them out by hand, or use a gentle, safe weedkiller, following guidance such as that by the RHS.
The Lowdown
Artificial grass is a smart, low-maintenance solution that looks great 24/7/365. Whether you’re laying it on soil, decking, or concrete, the key to a solid finish is proper preparation and using the right materials for the job.
We’ve hope to have satisfied your ‘how to lay artificial grass curiosity’. If you’re looking for more DIY and landscaping reading material, we’ve got plenty more blog posts for you to browse. Alternatively, if you’re looking to stock up on tools and turf for your upcoming artificial grass installation process, give our products a look over!
 Processing